Modular Programming
- Partition source code into modular solution
- Compile modules on Linux and Windows platforms
A modular design consists of a set of modules, which are developed and tested separately. Modular programming implements modular designs and is supported by both procedural and object-oriented languages. The C programming language supports modular design through library modules composed of functions. The stdio module provides input and output support while hiding its implementation details; typically, the implementation for scanf() and printf() ships in binary form with the compiler. The stdio.h header file provides the interface, which is all that we need to complete our source code.
This chapter describes how to create a module in an object-oriented language using C++, how to compile the source code for each module separately and how to link the compiled code into a single executable binary. The chapter concludes with an example of a unit test on a module.
MODULES
A well-designed module is a highly cohesive unit that couples loosely to other modules. The module addresses one aspect of the programming solution and hides as much detail as practically possible. A compiler translates the module's source code independently of the source code for other modules into its own unit of binary code.
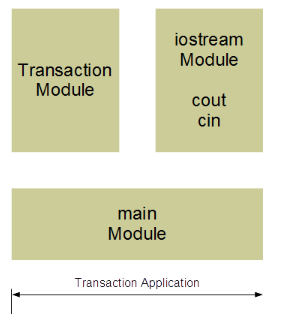
Consider the schematic of the Transaction application shown below. The main module accesses the Transaction module. The Transaction module accesses the iostream module. The Transaction module defines the transaction functions used by the application. The iostream module defines the cout and cin objects used by the application.
To translate the source code of any module the compiler only needs certain external information. This information includes the names used within the module but defined outside the module. To enable this in C++, we store the source code for each module in two separate files:
- a header file - defines the class and declares the function prototypes
- an implementation file - defines the functions and contains all of the logic
The file extension .h (or .hpp) identifies the header file. The file extension .cpp identifies the implementation file.
Note, however, that the names of the header files for the standard C++ libraries do not include a file extension (consider for example, the
<iostream>header file for thecoutandcinobjects).
Example
The implementation file for the main module includes the header files for itself (main.h) and the Transaction module (Transaction.h). The main.h file contains definitions specific to the main module and the Transaction.h file contains definitions specific to the Transaction module.
The implementation file for the Transaction module includes the header files for itself (Transaction.h) and the iostream module. The Transaction.h file contains definitions specific to the Transaction module and the iostream file contains definitions specific to the iostream module.
An implementation file can include several header files but DOES NOT include any other implementation file. Note the absence of any direct connections between the implementation files.
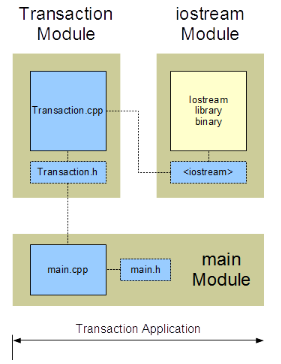
We compile each implementation (*.cpp) file separately and only once. We do not compile header (*.h) files (since they are already included in the implementation files).

A compiled version of iostream's implementation file is part of the system library.
STAGES OF COMPILATION
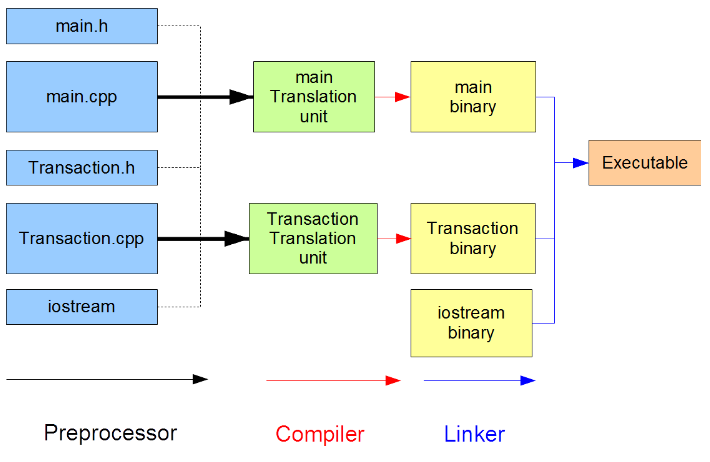
Comprehensive compilation consists of three independent but sequential stages (as shown in the figure below):
- Preprocessor: Interprets all directives creating a single translation unit for the compiler - (inserts the contents of all
#includeheader files), (substitutes all#definemacros) - Compiler: Compiles each translation unit separately and creates a corresponding binary version
- Linker: Assembles the various binary units along with the system binaries to create one complete executable binary
A MODULAR EXAMPLE
Consider a trivial accounting application that accepts journal transactions from the standard input device and displays them on the standard output device. For presentation simplicity, the application does not perform any intermediate calculation.
The application design consists of two modules:
- Main: supervises the processing of each transaction
- Transaction: defines the input and output logic for a single transaction
Transaction Module
The transaction module defines a structure and functions for a single transaction
- Transaction: holds the information for a single transaction in memory
The related functions are global functions
- enter(): accepts transaction data from the standard input device
- display(): displays transaction data on the standard output device
Transaction.h
The header file for our Transaction module defines our Transaction type and declares the prototypes for our two functions:
// Modular Example
// Transaction.h

struct Transaction {
    int acct;      // account number
    char type;     // credit 'c' debit 'd'
    double amount; // transaction amount
};

void enter(struct Transaction* tr);
void display(const struct Transaction* tr);
Note the UML naming convention and the extension on the name of the header file.
Transaction.cpp
The implementation file for our Transaction module defines our two functions. This file includes the system header file for access to the cout and cin objects and the header file for access to the Transaction type.
// Modular Example
// Transaction.cpp

#include <iostream> // for cout, cin
#include "Transaction.h"  // for Transaction
using namespace std;

// prompts for and accepts Transaction data
//
void enter(struct Transaction* tr) {

    cout << "Enter the account number : ";
    cin  >> tr->acct;
    cout << "Enter the account type (d debit, c credit) : ";
    cin  >> tr->type;
    cout << "Enter the account amount : ";
    cin  >> tr->amount;
}

// displays Transaction data
//
void display(const struct Transaction* tr) {

    cout << "Account " << tr->acct;
    cout << ((tr->type == 'd') ? " Debit $" : " Credit $") << tr->amount;
    cout << endl;
}
Note the .cpp extension on the name of this implementation file
Main Module
The main module defines a Transaction object and accepts input and displays data for each of three transactions.
main.h
The header file for our Main module #defines the number of transactions:
// Modular Example
// main.h

#define NO_TRANSACTIONS 3
main.cpp
The implementation file for our Main module defines the main() function. We #include the header file to provide the definition of the Transaction type:
// Modular Example
// main.cpp

#include "main.h"
#include "Transaction.h"

int main() {
    int i;
    struct Transaction tr;

    for (i = 0; i < NO_TRANSACTIONS; i++) {
        enter(&tr);
        display(&tr);
    }
}
Command Line Compilation
Linux
g++ main.cpp Transaction.cpp -o accounting -Wall
-o accounting: the compiled application (executable) will be named accounting-Wall: the compiler will report all warnings
To run the executable, we enter
accounting
Legacy Linux
To compile an application that includes a C++11 feature on a legacy Linux installation, we may need to specify the standard option. For example, to access C++11 features on the GCC 4.6 installation on our matrix cluster, we add the -std=c++11 option:
g++ main.cpp Transaction.cpp -o accounting -Wall -std=c++11
-std=c++11: the code will be compiled using the C++11 standard
Visual Studio
Command line
To compile our application at the command-line on a Windows platform using the Visual Studio compiler, we enter the command (To open the Visual Studio command prompt window, we press Start > All Programs and search for the prompt in the Visual Studio Tools sub-directory. )
cl /Fe accounting main.cpp Transaction.cpp
The /Fe option identifies the name of the executable. The names of the two implementation files follow this option.
To run the executable, we enter
accounting
IDE
Integrated Development Environments (IDEs) are software development applications that integrate features for coding, compiling, testing and debugging source code in different languages. The IDE used in this course is Microsoft's Visual Studio.
Build and Execute
The following steps build and execute a modular application in Visual Studio 2022 or newer:
- Start Visual Studio
- On opening Dialog
Select Create a new Project - On Create a new project Dialog
Select Empty ProjectC++WindowsConsole - Click/Tap Next
- On Configure your new project Dialog
- In Project name type the name of your task (i.e., workshop1, project, etc...)
- in Location press
...and select a folder in which you would like the project folder reside - leave the solution name untouched and check the
Place solution and project in the same directorycheckbox. - CliClick/Tapck
Create
- In the Solution Explorer window (if the solution explorer window is not open, in Menu select
View/Solution Exploreror HoldCtrl+ALTand press 'L')- To add files to the project, right-click on the Project name and select
Add New Item - for CPP files: In the
Visual C++/Codesection selectC++ fileand add your.cppfiles - for Header files: In the
Visual C++/Codesection selectHeader Fileand add your.hfiles - Click/Tap
Add
- To add files to the project, right-click on the Project name and select
- To Compile and run your application
- On the Menu select
Debug/Start Without Debugging or pressCtrl+F5`.
- On the Menu select
The input prompts and the results of execution appear in a Visual Studio command prompt window.
UNIT TESTS
Unit testing is integral to modular programming. A unit test is a code snippet that tests a single assumption in a module or work unit of a complete application. Each work unit is a single logical component with a simple interface. Functions and classes are typical examples.
We use unit tests to examine the work units in an application and rerun the tests after each upgrade. We store the test suite in a separate module.
Calculator Example
Consider a Calculator module that raises an integer to the power of an integer exponent and determines the integer exponent to which an integer base has been raised to obtain a given result. The header file for the Calculator module includes the prototypes for these two work units:
// Calculator.h
// ...
int power(int, int);
int exponent(int, int);
The suite of unit tests for this module checks if the implementations return the expected results. The header file for the Tester module contains:
// Tester.h

int testSuite(int BASE, int EXPONENT, int RESULT);
The implementation file for the Tester module contains:
// Tester.cpp

#include<iostream>
using namespace std;
#include "Calculator.h"

int testSuite(int BASE, int EXPONENT, int RESULT) {
    int passed = 0;
    int result;
    result = power(BASE, EXPONENT);
    if (result == RESULT) {
        cout << "Raise to Power Test Passed" << endl;
        passed++;
    }
    else {
        cout << "Raise to Power Test Failed" << endl;
    }
    result = exponent(RESULT, BASE);
    if (result == EXPONENT) {
        cout << "Find Exponent Test Passed" << endl;
        passed++;
    }
    else {
        cout << "Find Exponent Test Failed" << endl;
    }
    return passed;
}
A first attempt at implementing the Calculator module might look like:
// Calculator.cpp

#include "Calculator.h"

int power(int base, int exp) {
   int i, result = 1;
   for (i = 0; i < exp; i++)
       result *= base;
   return result;
}

int exponent(int result, int base) {
   int exp = 0;
   while(result >= base) {
       exp++;
       result /= base;
   }
   return exp;
}
The following is the test main.
// Test Main
// testmain.cpp

#include<iostream>
using namespace std;
#include "Tester.h"

int main() {
    int passed = 0;
    passed += testSuite(5, 3, 125);
    passed += testSuite(5, -3, 0.008);
    cout << passed << " Tests Passed" << endl;
}
Here is the output of the test main.
Raise to Power Test Passed
Find Exponent Test Passed
Raise to Power Test Failed
Find Exponent Test Failed
2 Tests Passed
The tester shows that this implementation does not handle negative-valued bases correctly and needs upgrading.
Good Programming Practice
It is good programming practice to write the suite of unit tests for the work units in a module as soon as we have defined the header file and before coding the bodies of the work units. As we complete implementation details, we continue testing our module to ensure that it produces the results that we expect and to identity the work that needs to be done.
DEBUGGING TECHNIQUES
Programming Errors
Programming errors that require debugging skills are of two kinds:
- syntactic
- semantic
Syntactic Errors
Syntactic errors are errors that break the rules of the programming language. The most common syntactic errors in C++ language programs are:
- missing semi-colon after a struct or class definition
- unnecessary semi-colon terminator in a #define directive
- undeclared variable name or missing header file
- mismatched parentheses
- left-side of an assignment expression is not a defined memory location
- return statement is missing
Semantic Errors
Semantic errors are errors that fail to implement the intent and meaning of the program designer. The more common semantic errors are:
=instead of==- iteration without a body (for/while followed by a semi-colon)
- uninitialized variable
- infinite iteration
- incorrect operator order in a compound expression
- dangling else
- off-by-one iteration
- integer division and truncation
- mismatched data types
&instead of&&- Idenfiying Errors
Syntactic Errors
Techniques for identifying syntactic errors include
- IDE intellisense
- compiler error messages (compiler output)
- comparing error messages from different compilers - some are more cryptic than others
- reading code statements (walkthroughs)
Semantic Errors
Techniques for identifying semantic errors include:
- vocalization - use your sense of hearing to identify the error (compound conditions)
- intermediate output - cout statements at critical stages
- walkthrough tables
- interactive debugging using
- Visual Studio IDE - integrated debugger for Windows OSs
- Eclipse IDE - integrated debugger for Linux OSs
- gdb - GNU debugger for gcc
IDE Tracing Example
The following steps trace through the execution of our Transaction application using the Visual Studio IDE debugger
- Select the file named main.cpp
- Move the cursor to the left-most column of the for statement in the main() function and left-click | This places a red dot in that column, which identifies a breakpoint
- Move the cursor to the left-most column of the closing brace for the function and left-click | This places a red dot in the column, which identifies another breakpoint
- Select Debug -> Start Debugging | Execution should pause at the first executable statement
- Observe the values under the Locals tab in the Window below the source code
- Press F10 and answer the three input prompts
- Select the source code Window
- Observe the values under the Locals tab in the Window below the source code
- Press F10 3 times and note the value of i
- Press F5, note where execution pauses and observe the value of i
- Press F5 again to exit
The keystrokes for the various debugging options are listed next to the sub-menu items under the Debug menu.
SUMMARY
- a module consists of a header file and an implementation file
- a module's header file declares the names that are exposed to client modules
- a module's implementation file defines the module's logic
- a module's implementation file needs the header files of those modules that define classes or functions used in the implementation file
- the three stages of creating an executable are preprocessing, compiling, and linking
- it is good practice to write the suite of unit tests for each module of an application before coding the module's implementation
EXERCISES
- Upgrade the Calculator module to pass all of the tests and add further tests to improve robustness
- Complete the Workshop on Compiling Modules
- Read Wikipedia on Modular Programming